Please reach out to our support team should you still not have your local IP address. For the support team to be able to verify your IP, the server must be powered on and have a stable internet connection.
Once you have your IP address, you will copy/paste the IP into your address bar and add “/operator”. For example, if your IP is,
192.168.x.xxx
You will write it as follows,
192.168.x.xxx/operator
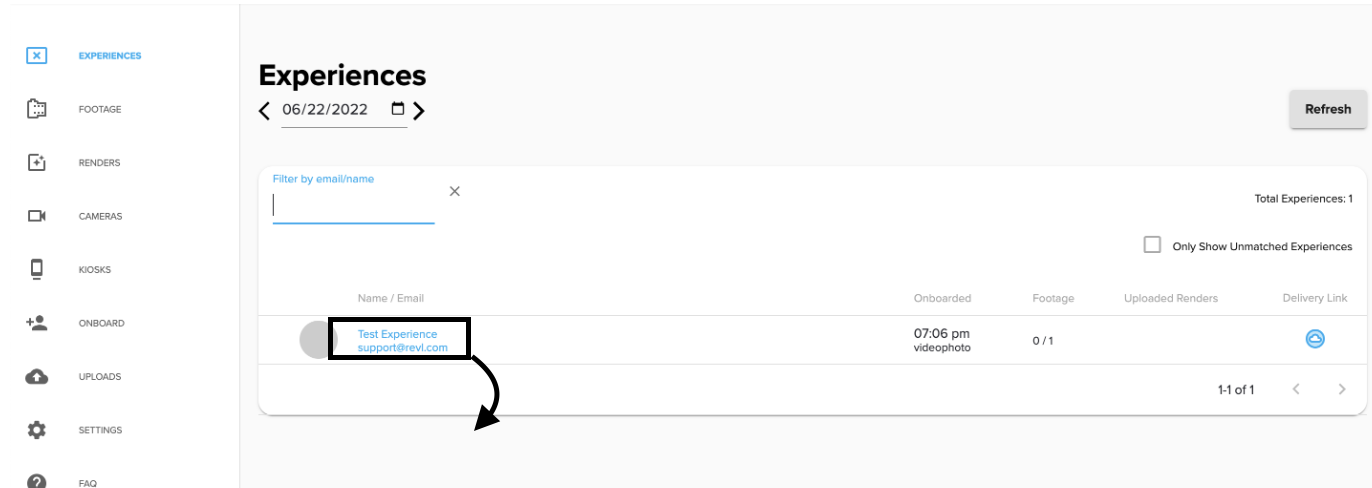
Once you have accessed your local server, you should be able to see a page as follows,

Quick Overview of your Operator Portal
On the main page of your local server, you will see different menu options on the left side of the page,

In order, let’s now go one by one for a brief overview of what these pages are:
-
Experiences: customer onboardings where you will be able to see and edit customer information such as name, email, and pre-sale media packages.
-
Footage: customer’s footage where you will be able to match, unmatch, review, and split footage as necessary.
-
Renders: Keep track of your renders, how many are pending, and if any renders have failed.
-
Cameras: see all of your current cameras, and what firmware each camera is on. You can also see each Camera ID, which is helpful if you suspect a camera to not be operating correctly.
-
Onboard: manually onboard your customers, by entering their name, email, and package.
-
Uploads: keep track of how many media packages are still pending upload.
Experiences
In the experiences main page, you will see all of your customer's experiences for the date on the top-left corner.

Once on your main page, from left to right, you will see,
- Customer name/email,
- Time onboarded
- Available footage
- Uploaded renders
- Delivery link (blue circle with white cloud)
To the right of the search bar, notice where it says Only Show Unmatched Experiences. By clicking on the box next to that, you can filter your experiences to only those that are missing footage.
You can also notice if your customer is missing footage by looking at the footage section.
- If a customer is missing footage, it will show a number such as 0/1, 0/2 or 1/2 depending on how many footage sets are tied to this customer.
- If footage appears as 1/1 or 2/2, this customer has all their footage footage matched.
Similarly, you can verify if your customer is missing renders by looking at the uploaded renders section.
- If there are no renders to upload, that section will be empty as the example above. This means that, either there is no footage, or the render failed.
- If this section is shown as a 1/1, 2/2, 3/3, this means all renders for this customer have been uploaded.
Finally, if all renders have uploaded, you can select the delivery link section, which will take you to your customers uploaded renders. Should your customer have any issues with the arrival of the delivery link, simply copy/ paste the URL of said delivery link and send it to them.
How to update customer information on their personal experiences page
To access this page, select the customer's name/email, shaded in blue, from the main experiences page. This will take you to their personal experience page

On this page, from top to bottom you can see:
- Customer's name
- Experience ID (the code under the name),
- Date
- Cloud link
You will also notice the four main sections of your customer's personal experience page, where you can find/ edit all relevant information for them. These sections are named as follows,
- Onboard: here you are able to update your customer's name and email by changing them and then clicking submit

Be sure you have the correct email prior to changing it. Once it has been changed, there is no way to recover the previous one. - Pre Sale Media Purchase: On this page you are able to update your customer's package as necessary. To change their package,
- Select the package, shaded in blue as shown below,

- This will prompt a drop-down menu with the available packages,

- Choose the package, click on the check mark next to it and then Queue new request (button shaded in green), so the new package can be created and sent,

- Select the package, shaded in blue as shown below,
3. Footage
Here you can see the camera ID of the camera used to record this experience. Everything before the hyphen is the camera ID. In the below example the camera ID is,
AOJ5LB001286
Selecting the footage link, will take you to that customer's footage page.

4. Render Requests
Once you have made the necessary corrections to footage, you will go to the render requests section and press the green button that says Queue new request. This will begin the render process and create your customer's media.

Footage
In the footage section, you will see all footage uploaded for that date,
 From left to right, you will see,
- Footage link, with time the footage was received and the camera ID below.
- How many videos are on that footage set.
- Time it was scanned for its QR code.
- If the footage is matched to any customer (blue square = matched, orange triangle = unmatched). Selecting the blue square will take you to the experience this footage is matched to.
- You can also select the Only Show Unmatched Footage button, to filter out all footage sets that are already matched.
What can you do in the Footage Section
There are three main tools you can access on your customer's personal footage page, which are the splitting tool, review tool, and marking tool.
- Splitting Tool: remove an unwanted video clip from a customer's footage set.
- To split footage, unmatch by choosing Un-match from Experience from the top-right corner of the footage page.

- Select the Action Menu (the gear on the top-right of the videos) and select Enter Split Mode.

- Next, select the box on the top-left of the video you want to remove

- Select Split from the bottom right corner.
- Re-match footage to its corresponding customer by choosing the correct name/ email from the section below the calendar, and then pressing the Match to Experience button.

- Finally, Queue a new render on the customer's experience page, which you can access by choosing the link under where it says Matched

Should you need to find the split footage clip, you can find it on the footage section among the unmatched pieces of footage. Once you split a clip it cannot be added back to that set of footage. If you accidentally split the incorrect clip, please contact support.-
- To split footage, unmatch by choosing Un-match from Experience from the top-right corner of the footage page.
- Reviewing Tool: used when there is a specific section of a video you want to remove.
- To ban footage, unmatch it from the customer.
- Select the Action Menu and choose Enter Review Mode (a zero on the top-right corner of each video should appear).

- Choose the video you want to correct, and you will see a small window of the chosen video pop-up on your screen.

- Next to where it says Forbidden you will notice there are two boxes that say Start and End. If, for example, you want to ban the first 5 seconds of footage, you will leave the start box on zero, and will click on the 5 second mark on the end box as shown below,

- This means that the footage through 0 - 5 seconds will not appear on your render.
- You will then select Save (a red FORBIDDEN sign should appear below), and then select OK.

- You should now see a (1) on the top-right corner of the banned video.

- Select Submit Review at the bottom-right corner to save your changes.

- Finally, re-match footage and queue a new render for these changes to take place in your customer's media.
Should you wish to undo a review, select the reviewed video and click on the (X) next to the red Forbidden sign.
3. Marking Tool: used if you have a footage set that you would like to review or correct. There are two ways to mark an experience for review.
-
- On the footage set you want to mark, select the action menu and then choose Mark as Needing Review. Footage marked for review will have a red banner that reads Review Required over the videos.

However, marking footage for review after it has been uploaded may result in a render being created and sending out to your customer. This is because the render process will automatically begin once footage has been uploaded. If you marked it for review after the render has begun, there is a chance the render has already finished and sent. - The recommended way to mark footage for review is, prior to docking the camera,
- Start recording
- Have your TI record themselves, briefly describing why they are marking this footage for review.
- Tap the button with the three lines, you will see a chevron pop up on screen, and then repeat the process two more times (3x in total). This will mark your footage for review before docking the camera.
- It is essential you wait for the chevron symbol to appear on screen before tapping the button again. If you tap the button three times without waiting for the chevron to appear, it will not mark it for review and you run the risk of it rendering out footage.
- On the footage set you want to mark, select the action menu and then choose Mark as Needing Review. Footage marked for review will have a red banner that reads Review Required over the videos.
Renders, Cameras, and Uploads
These three sections are a good place to get information on how your site and equipment is performing.
- Renders: see your render queue and check how many experiences are pending renders. If you select the experience ID under Experience it will take you to that customer's experience page.

- Cameras: see all of your current cameras and the firmware they are currently on.

Should you have an experience that is not rendering, or rendering incorrectly, and you suspect it could be the camera,- Check the camera ID on the experiences section and see which camera it belongs to.
- Go to the footage section and verify other footage sets recorded with that same camera.
- Should you see multiple instances of errors such as audio capture failure, footage not being recorded, or corrupt footage, please set that camera aside until you can send it to us for further investigating and we can replace your camera.
- Once you receive a replacement camera, record test footage and dock the camera to confirm it is recording/transferring footage correctly. This will also make your camera appear on your cameras section. Cameras will only be seen on the 'cameras section' once footage has been recorded and transferred to the local server.
- Uploads: keep track of render uploads and see how many you have pending.

Onboard
Should you have a problem with a QR code scan, or are unable to onboard a customer for any reason, here you can manually onboard your customers, by entering their name, email, and package.

Please note you will need to manually match footage after creating the new onboarding. It will not take into account QR code scans and automatically match to its corresponding footage set.